Friday, September 19, 2014

How To Install FreePBX 12 on CentOS 6.5

Initial System Setup

You MUST run all of these commands as the root user!
You MUST disable selinux.  selinux can cause strange behavior during the install

Disable selinux

In /etc/sysconfig/selinux , change the following lines:

sed -i 's/\(^SELINUX=\).*/\SELINUX=disabled/' /etc/selinux/config

reboot, and verify the selinux status by running 'sestatus'. It should say:

SELinux status: disabled

Update Your System


yum -y update
yum groupinstall core
yum groupinstall base

Install Additional Required Dependencies

yum install gcc gcc-c++ lynx bison mysql-devel mysql-server php php-mysql php-pear php-mbstring tftp-server httpd make ncurses-devel libtermcap-devel sendmail sendmail-cf caching-nameserver sox newt-devel libxml2-devel libtiff-devel audiofile-devel gtk2-devel subversion kernel-devel git subversion kernel-devel php-process crontabs cronie cronie-anacron wget vim php-xml

Add Asterisk/Digium CentOS Repos


cd /etc/yum.repos.d 
wget http://packages.asterisk.org/centos/centos-asterisk-12.repo
wget http://packages.asterisk.org/centos/centos-asterisk-11.repo
wget http://packages.asterisk.org/centos/centos-asterisk.repo
wget http://packages.digium.com/centos/centos-digium-12.repo
wget http://packages.digium.com/centos/centos-digium-11.repo
wget http://packages.digium.com/centos/centos-digium-1.8-certified.repo
wget http://packages.digium.com/centos/centos-digium-1.8.repo
wget http://packages.digium.com/centos/centos-digium.repo

IPTables

Keeping IPTables turned off indefinitely is strongly discouraged. You will incur the wrath of high fees and hackers
You must disable the default iptables.  You can re-enable it later, once you have made the appropriate changes.  Information on iptables can be found with a quick Google search.  If iptables is left running, it will (at very least) block you from accessing the web interface.
See the current status:   
chkconfig iptables --list
Disable iptables:
chkconfig --level 0123456 iptables off
Stop the service (this skips rebooting again):
service iptables stop

Auto Start MySQL

You must have mysql running for freepbx to operate normally.  You need to set it to start at boot time. with the following command:
chkconfig --level 345 mysqld on
Then start mysqld if you don't plan on rebooting during the installation phase:
service mysqld start

Auto Start Apache

You will want Apache running, so you can access the FreePBX admin interface,  You need to set it to start at boot time. with the following command:
chkconfig --level 345 httpd on
Then start apache if you don't plan on rebooting during the installation phase:
service httpd start

Install PearDB

pear channel-update pear.php.net
pear install db
You may receive a warning:
WARNING: "pear/DB" is deprecated in favor of "pear/MDB2"
At this time it is safe to ignore that message

Reboot server

reboot

Install Dependencies for Google Voice (If needed/wanted)

Install iksemel

cd /usr/src
wget https://iksemel.googlecode.com/files/iksemel-1.4.tar.gz
tar xf iksemel-*.tar.gz
cd iksemel-*
./configure
make
make install

Add the Asterisk User

adduser asterisk -M -c "Asterisk User"

Install and Configure Asterisk

Install DAHDI.

If you have no TDM cards you can skip this step
yum install dahdi-linux dahdi-tools libpri

Install Asterisk

Each major version of Asterisk has its own repository. Within the repository, there are many different packages available for Asterisk. Different packages will install Asterisk with different modules enabled, such as ODBC voicemail.
By default, the various Asterisk repositories are disabled. This allows you to have multiple Asterisk repository definitions installed on a single machine, and to choose which major version of Asterisk you'd like to install when running yum install.
You can select Asterisk 11 instead by switching "asterisk-12" out for "Asterisk-11"
yum install asterisk asterisk-configs --enablerepo=asterisk-12

Install Asterisk-Extra-Sounds

yum install asterisk-sounds*

Install and Configure FreePBX

Download and extract FreePBX.

export VER_FREEPBX=12.0
cd /usr/src
git clone http://git.freepbx.org/scm/freepbx/framework.git freepbx
cd freepbx
git checkout release/${VER_FREEPBX}

Set ownership permissions.

chown asterisk. /var/run/asterisk
chown -R asterisk. /etc/asterisk
chown -R asterisk. /var/{lib,log,spool}/asterisk
chown -R asterisk. /usr/lib/asterisk
mkdir /var/www/html
chown -R asterisk. /var/www/

A few small modifications to Apache.

sed -i 's/\(^upload_max_filesize = \).*/\120M/' /etc/php.ini
cp /etc/httpd/conf/httpd.conf /etc/httpd/conf/httpd.conf_orig
sed -i 's/^\(User\|Group\).*/\1 asterisk/' /etc/httpd/conf/httpd.conf
service httpd restart

Configure Asterisk database in MYSQL.

cd /usr/src/freepbx
export ASTERISK_DB_PW=Change_Me109
mysqladmin -u root create asterisk 
mysqladmin -u root create asteriskcdrdb

Set permissions on MYSQL database.

mysql -u root -e "GRANT ALL PRIVILEGES ON asterisk.* TO asteriskuser@localhost IDENTIFIED BY '${ASTERISK_DB_PW}';"
mysql -u root -e "GRANT ALL PRIVILEGES ON asteriskcdrdb.* TO asteriskuser@localhost IDENTIFIED BY '${ASTERISK_DB_PW}';"
mysql -u root -e "flush privileges;"

Restart Asterisk and install FreePBX.

cd /usr/src/freepbx
./start_asterisk start
./install_amp --installdb --username=asteriskuser --password=${ASTERISK_DB_PW}
amportal chown
amportal a ma installall
amportal chown
amportal a reload
If you see an error about "Uncaught exception 'RuntimeException' with message 'gpg took too long to run.'" it is safe to run "amportal a ma installall" again.

Finally, one last mod and start FreePBX.

ln -s /var/lib/asterisk/moh /var/lib/asterisk/mohmp3
amportal start

Start FreePBX

Navigate: 

Install and Setup Commercial Modules

Enable the FreePBX Commercial yum repos

wget -P /etc/yum.repos.d/ -N http://yum.schmoozecom.net/schmooze-commercial/schmooze-commercial.repo

yum clean all to clean out yum cache so it will find out new RPMs

yum clean all

yum install needed RPMs for Commercial Modules

yum -y install php-5.3-zend-guard-loader sysadmin fail2ban incron ImageMagick

Restart Apache and Install Sysadmin

service httpd restart
amportal a ma download sysadmin
amportal a ma install sysadmin

For Further information see: Install FreePBX

Wednesday, June 18, 2014

Setup Help Desk System Using OTRS 3.3.6 On CentOS 6.5

Introduction

OTRS, stands for Open source Ticket Request System, is a popular help desk software that can be used to assign tickets to incoming queries, and tracks further communications when needed. using OTRS, we can manage incoming inquiries, complaints, support requests, defect reports, and other communications.
In this tutorial, let us see how to install OTRS latest version on CentOS 6.5. Here, my testbox details are given below:
  • Operating System: CentOS 6.5 Minimal
  • IP Address: 192.168.1.2/24
  • Hostname: server.unixmen.local

Prerequisites

Before installing OTRS, we have to do couple of prerequisites first.
First, make sure you have configured the proper FQDN name in /etc/hosts file.
vi /etc/hosts
Set the hostname as shown below:
127.0.0.1   localhost localhost.localdomain localhost4 localhost4.localdomain4
 ::1         localhost localhost.localdomain localhost6 localhost6.localdomain6
 192.168.1.2     server.unixmen.local    server
Log off or restart the system to take effect the saved changes.
Install and enable EPEL repository.
Log in as root user and Install Mysql server using the following command:
yum install mysql-server
Start mysql service as shown below:
service mysqld start
chkconfig mysqld on
By default, Mysql root user is blank. So let us setup the root user password as shown below:
mysql_secure_installation
NOTE: RUNNING ALL PARTS OF THIS SCRIPT IS RECOMMENDED FOR ALL MySQL
 SERVERS IN PRODUCTION USE!  PLEASE READ EACH STEP CAREFULLY!

In order to log into MySQL to secure it, we'll need the current
password for the root user.  If you've just installed MySQL, and
you haven't set the root password yet, the password will be blank,
so you should just press enter here.

Enter current password for root (enter for none): -----> Press Enter
OK, successfully used password, moving on...

Setting the root password ensures that nobody can log into the MySQL
root user without the proper authorisation.

You already have a root password set, so you can safely answer 'n'.

Change the root password? [Y/n] y -----> Enter Y and press Enter
 New password: -----> Enter the new password
 Re-enter new password: -----> Enter password again
 Password updated successfully!
 Reloading privilege tables..
 ... Success!

By default, a MySQL installation has an anonymous user, allowing anyone
 to log into MySQL without having to have a user account created for
 them.  This is intended only for testing, and to make the installation
 go a bit smoother.  You should remove them before moving into a
 production environment.

Remove anonymous users? [Y/n] y -----> Press Enter
 ... Success!

Normally, root should only be allowed to connect from 'localhost'.  This
 ensures that someone cannot guess at the root password from the network.

Disallow root login remotely? [Y/n] y -----> Press Enter
 ... Success!

By default, MySQL comes with a database named 'test' that anyone can
 access.  This is also intended only for testing, and should be removed
 before moving into a production environment.

Remove test database and access to it? [Y/n] y -----> Press Enter
 - Dropping test database...
 ERROR 1008 (HY000) at line 1: Can't drop database 'test'; database doesn't exist
 ... Failed!  Not critical, keep moving...
 - Removing privileges on test database...
 ... Success!

Reloading the privilege tables will ensure that all changes made so far
 will take effect immediately.

Reload privilege tables now? [Y/n] y -----> Press Enter
 ... Success!

Cleaning up...

All done!  If you've completed all of the above steps, your MySQL
 installation should now be secure.

Thanks for using MySQL!
MySQL has been installed successfully with default options. In order to work properly with OTRS, we have to add the following directives into the my.cnf file.
Edit file /etc/my.cnf,
vi /etc/my.cnf
Add the following lines under the [mysqld] section:
max_allowed_packet=20M
query_cache_size=32M
Save and close the file.
Next, restart mysql service using the following command:
service mysqld restart
Next, Install httpd package with command:
yum install httpd
Start httpd service, and make it to start automatically on every reboot.
service httpd start
chkconfig httpd on
Edit file /etc/httpd/conf/httpd.conf,
cp /etc/httpd/conf/httpd.conf /etc/httpd/conf/httpd.conf.bak
vi /etc/httpd/conf/httpd.conf
Find the following lines and modify them as shown below:
ServerAdmin root@domain.com
ServerName [hostname or IP address]:80
Listen IP-address-of-the-server:80
Example:
ServerAdmin root@unixmen.local
ServerName 192.168.1.2:80
Listen 192.168.1.2:80
Save and close file. Restart httpd service.
service httpd restart
Adjust iptables to allow apache default port 80.
Edit file /etc/sysconfig/iptables,
vi /etc/sysconfig/iptables
Add the following line:
-A INPUT -p tcp -m state --state NEW -m tcp --dport 80 -j ACCEPT
Then, restart iptables to take effect the saved changes using the following command:
service iptables restart
Disable SELinux, otherwise you will get the following error:
If you want to use the installer, set the Kernel/Config.pm writable for the webserver user!
To disable SELinux, Edit file /etc/sysconfig/selinux,
vi /etc/sysconfig/selinux
Set value to disabled.
SELINUX=disabled
After that, reboot the system.

Download OTRS

Go to the OTRS download page and download the latest version.
wget http://ftp.otrs.org/pub/otrs/RPMS/rhel/6/otrs-3.3.6-01.noarch.rpm
The above will download and save the OTRS rpm file in the current directory. Install it using command:
yum install otrs-3.3.6-01.noarch.rpm
The above command will install otrs package along with all required packages.
Finally, restart httpd service one more time after installing OTRS.
service httpd restart
During OTRS installation, keep attention on the installer. It will display the web installer URL for OTRS.
Look at the following screenshot.
root@server:~_001

Install Additional PERL modules

Before proceeding to configure OTRS, you should install additional perl modules. Run the following command to know the required modules by OTRS:
/opt/otrs/bin/otrs.CheckModules.pl
Sample output:
o Crypt::Eksblowfish::Bcrypt.......Not installed! (optional - For strong password hashing.)
 o Crypt::SSLeay....................ok (v0.57)
 o Date::Format.....................ok (v2.22)
 o DBI..............................ok (v1.609)
 o DBD::mysql.......................ok (v4.013)
 o DBD::ODBC........................Not installed! (optional - Required to connect to a MS-SQL database.)
 o DBD::Oracle......................Not installed! (optional - Required to connect to a Oracle database.)
 o DBD::Pg..........................Not installed! (optional - Required to connect to a PostgreSQL database.)
 o Encode::HanExtra.................Not installed! (optional - Required to handle mails with several Chinese character sets.)
 o GD...............................Not installed! (optional - Required for stats.)
 o GD::Text.......................Not installed! (optional - Required for stats.)
 o GD::Graph......................Not installed! (optional - Required for stats.)
 o IO::Socket::SSL..................ok (v1.31)
 o JSON::XS.........................Not installed! (optional - Recommended for faster AJAX/JavaScript handling.)
 o List::Util::XS...................ok (v1.21)
 o LWP::UserAgent...................ok (v6.05)
 o Mail::IMAPClient.................Not installed! (optional - Required for IMAP TLS connections.)
 o IO::Socket::SSL................ok (v1.31)
 o ModPerl::Util....................ok (v2.000004)
 o Net::DNS.........................ok (v0.65)
 o Net::LDAP........................ok (v0.40)
 o Net::SSL.........................ok (v2.84)
 o PDF::API2........................Not installed! (optional - Required for PDF output.)
 o Compress::Zlib.................ok (v2.021)
 o Text::CSV_XS.....................Not installed! (optional - Recommended for faster CSV handling.)
 o Time::HiRes......................ok (v1.9721)
 o XML::Parser......................ok (v2.36)
 o YAML::XS.........................Not installed! (required - Please install this module - )
As you see in the above output, some perl modules are missing. Install them all at once or one by one as shown below.
yum install "perl(Crypt::Eksblowfish::Bcrypt)" "perl(DBD::ODBC)" "perl(DBD::Oracle)" "perl(DBD::Pg)" "perl(Encode::HanExtra)" "perl(GD)" "perl(GD::Text)" "perl(GD::Graph)" "perl(JSON::XS)" "perl(Mail::IMAPClient)" "perl(PDF::API2)" "perl(Text::CSV_XS)" "perl(YAML::XS)"
Now, check again for any missing modules.
/opt/otrs/bin/otrs.CheckModules.pl
Sample output:
o Crypt::Eksblowfish::Bcrypt.......ok (v0.009)
 o Crypt::SSLeay....................ok (v0.57)
 o Date::Format.....................ok (v2.22)
 o DBI..............................ok (v1.609)
 o DBD::mysql.......................ok (v4.013)
 o DBD::ODBC........................ok (v1.48)
 o DBD::Oracle......................Not installed! (optional - Required to connect to a Oracle database.)
 o DBD::Pg..........................ok (v2.15.1)
 o Encode::HanExtra.................ok (v0.23)
 o GD...............................ok (v2.44)
 o GD::Text.......................ok (v0.86)
 o GD::Graph......................ok (v1.44)
 o IO::Socket::SSL..................ok (v1.31)
 o JSON::XS.........................ok (v2.27)
 o List::Util::XS...................ok (v1.21)
 o LWP::UserAgent...................ok (v6.05)
 o Mail::IMAPClient.................ok (v3.34)
 o IO::Socket::SSL................ok (v1.31)
 o ModPerl::Util....................ok (v2.000004)
 o Net::DNS.........................ok (v0.65)
 o Net::LDAP........................ok (v0.40)
 o Net::SSL.........................ok (v2.84)
 o PDF::API2........................ok (v2.019)
 o Compress::Zlib.................ok (v2.021)
 o Text::CSV_XS.....................ok (v0.85)
 o Time::HiRes......................ok (v1.9721)
 o XML::Parser......................ok (v2.36)
 o YAML::XS.........................ok (v0.38)
If everything seems good, proceed to web installer.

Begin OTRS Web installer

OTRS development team has made a simple way web based installer to make the installation lot easier.
Open up the web browser and navigate to http://ip-address/otrs/installer.pl.
The following screen will appear. Click Next to continue.
Install OTRS - Intro - OTRS - Mozilla Firefox_002Accept the License agreement.
Install OTRS - License - OTRS - Mozilla Firefox_003Select the database type. In my case, I select the MySQL database.
Install OTRS - Database Selection - OTRS - Mozilla Firefox_004Enter the MySQL root user name and password etc. Click Check database settings button.
Install OTRS - Database MySQL - OTRS - Mozilla Firefox_005Once you check the button “Check database settings”, a default database and user  will be automatically created. You can change these values as per your liking, or leave the default selection and click next to continue.
Install OTRS - Database MySQL - OTRS - Mozilla Firefox_006
Now the new database will be created. Click Next to continue.
Install OTRS-Create Database - OTRS - Mozilla Firefox_007Enter the administrator Email for OTRS, system FQDN, organization name etc. And, click Next.
Install OTRS - System Settings - OTRS - Mozilla Firefox_008Next, you’ll be prompted to enter the inbound and outbound mail settings. Also, You can setup this option later in the administration dashboard.
Install OTRS - Configure Mail - OTRS - Mozilla Firefox_009Congratulations! We have successfully implemented the OTRS system. Note down the the default username and password of the administrative account.
Install OTRS - Finished - OTRS - Mozilla Firefox_010As you see in the above screenshot, the installer shows you the the administrative login URL, default username and password.

Access OTRS dashboard

Navigate to http://ip-address/otrs/otrs/index.pl from your browser. Enter the default user name and password.
Login - OTRS - Mozilla Firefox_012This is how the OTRS administrative dashboard looks.
Dashboard - OTRS - Mozilla Firefox_013
After successful installation, we have to do some installation tasks. The first one is to start the scheduler. Click on the warning link that says: “Scheduler is not running” on the top.
Click Start Scheduler button.
Dashboard - OTRS - Mozilla Firefox_014
Next change the default password of the admin account(root@locahost) by clicking on the username on the upper top right corner.
Enter the current password, and enter the new password twice. Finally, click Update.
Preferences - OTRS - Mozilla Firefox_015

OTRS Administration

As you may know, working on OTRS with admin user is not recommended. So, create new users(agents).
Go to the Admin section on the top menu bar, and select Agents to create new user.
Admin - OTRS - Mozilla Firefox_016
Click on the Add Agent Link on the left.
Agents - Admin - OTRS - Mozilla Firefox_018Fill up the details such as first name, last name, password, and email id etc. Then, click Submit button.
Agents - Admin - OTRS - Mozilla Firefox_019
Next choose the group relations for the new agent. Then, click Submit button.
Agents --- Groups - Admin - OTRS - Mozilla Firefox_020The new agent will be created now.
Agents --- Groups - Admin - OTRS - Mozilla Firefox_022
By this way, you create more users(agents), groups, roles, customers etc from the Admin section.
Customer user:
Customer Users - Customers - OTRS - Mozilla Firefox_025

Create Tickets

Let us create a sample ticket, and assign this ticket to Agent sk. Navigate to Tickets -> New email ticket or Phone ticket.
Enter the customer user mail id, subject and body of the mail. Click on the Owner drop down box and select the Agent name. Finally, click Send mail. A new ticket will be created and assigned to the agent sk.
Sample Email ticket:
New email ticket - Ticket - OTRS - Mozilla Firefox_028Whenever, the agent sk, log in to the PTRS, he will see a ticket has been assigned to him in his dashboard.
Dashboard - OTRS - Mozilla Firefox_029The agent can see the full details of the new ticket by clicking on it.
2014040931000026 - Zoom - Ticket - OTRS - Mozilla Firefox_030
That’s it. For more details, look at the official documentation page.
Cheers!

Sunday, January 19, 2014

How To Install OwnCloud 6 in CentOS 6.4


To install ownCloud

Login as root

cd /etc/yum.repos.d/

wget http://download.opensuse.org/repositories/isv:ownCloud:community/CentOS_CentOS-6/isv:ownCloud:community.repo

rpm -Uvh http://download.fedoraproject.org/pub/epel/6/x86_64/epel-release-6-8.noarch.rpm

yum install owncloud

Restart Apache
service httpd restart


Setup SSL for a secure connection:

yum install mod_ssl

mkdir /etc/httpd/ssl 

openssl req -x509 -nodes -days 36500 -newkey rsa:2048 -keyout /etc/httpd/ssl/apache.key -out /etc/httpd/ssl/apache.crt

This command will prompt terminal to display a lists of fields that need to be filled in.
The most important line is "Common Name". Enter your official domain name here or, if you don't have one yet, your site's IP address.

touch /etc/httpd/conf.d/ssl.conf

vi /etc/httpd/conf.d/ssl.conf

Find the section that begins with and make some quick changes.
Uncomment the DocumentRoot and ServerName line and replace example.com with your DNS approved domain name 
        or server IP address (it should be the same as the common name on the certificate):

ServerName example.com:443


Find the following three lines, and make sure that they match the extensions below:

SSLEngine on
SSLCertificateFile /etc/httpd/ssl/apache.crt
SSLCertificateKeyFile /etc/httpd/ssl/apache.key 

Your virtual host is now all set up! Save and Exit out of the file.

Restart Apache
/etc/init.d/httpd restart


Open Browser to your server's IP

https://your_ip/owncloud

Proceed to create a username and password for admin account. 
Before submitting check under the “Advanced” dropdown for additional settings such as where is your data going to be stored and if you would like to use SQLite or MySQL
For this tutorial I will leave the data folder to default and use SQLite.
For a faster deployment you may want to use SQLite.


Upgrade To PHP 5.5

rpm -Uvh http://mirror.webtatic.com/yum/el6/latest.rpm

yum install yum-plugin-replace

yum replace php-common --replace-with=php55w-common


Increase Upload File Size greater than 513MB 

cd /var/www/html/owncloud
vi .htaccess

And change the values for

php_value upload_max_filesize 513M
php_value post_max_size 513M
php_value memory_limit 512M

To your desired/limitation values
1G,2G,10G,… max is 16GB

Save the file and restart apache server

Done!

Tuesday, October 1, 2013

Configure SSL VPN on Cisco UC540/560 and CP-79XX

1. Download Anyconnect windows package from here Cisco AnyConnect Client
2. Enable SSL VPN on UC540/560 via Cisco Configuration Assistant.
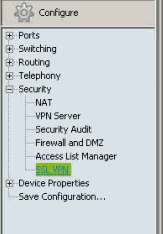
a. Log into CCA, go to Configure – Security – SSL VPN
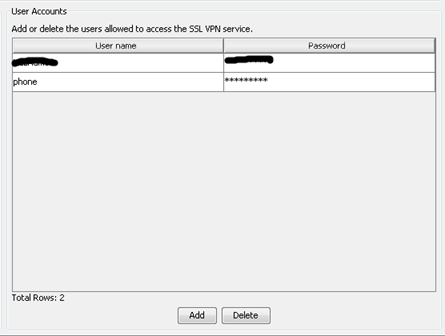
b. Under User Accounts – Click Add. Enter a new user (in this case we used user “phone” and password “ChangeMe2”).
c. Click “Advanced”. Select “Full Tunnel” mode and enter in a start and end IP range for remote clients.
d. Select “Install” under SSL VPN Client
e. Browse to the file downloaded in Step 1. Select download. (This may take some time to upload and install on the device).
f. Once it is installed, click OK to apply.
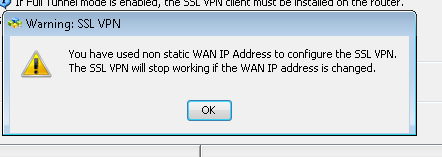
g. If device has a dynamically assigned IP address, you may receive the following error.
h. You can now close CCA, Saving the device configuration when prompted.
3. Log into Router via Telnet/SSH and enter global configuration mode.
4. Configure the UC as a Certificate Authority Server by entering the following commands.
a. Router(config)#crypto pki server uc_root
b. Router(config)#database level complete
c. Router(cs-server)#database url nvram:
d. Router(cs-server)#grant auto
e. Router(cs-server)#lifetime certificate 7305
f. Router(cs-server)#lifetime ca-certificate 7305
g. Router(cs-server)#exit
h. Router(config)#crypto pki trustpoint uc_root
i. Router(ca-trustpoint)# enrollment url
j. Router(ca-trustpoint)# revocation-check none
k. Router(ca-trustpoint)# rsakeypair uc_root
l. Router(cs-server)#exit
m. Router(config)# crypto pki server uc_root
n. Router(cs-server)#no shutdown
o. Please enter a passphrase to protect the private key Password: ***** Re-enter password: ****
5. Create a second trust point on the UC, and authenticate it and enroll it with the CA by entering the following commands.
a. Router(config)#crypto pki trustpoint uc_cert
b. Router(ca-trustpoint)# enrollment url
c. Router(ca-trustpoint)# revocation-check none
d. Router(ca-trustpoint)# exit
e. Router(config)# crypto pki authenticate uc_cert
f. Do you accept this certificate? [yes/no]: yes Trustpoint CA certificate accepted.
g. Router(config)# crypto pki enroll uc_cert Password:****** Re-enter password:******
h. Include the router serial number in the subject name? [yes/no]: no
i. Include an IP address in the subject name? [no]: no
j. Request certificate from CA? [yes/no]: yes
6. Enter telephone service configuration mode by entering the following command (telephony-service) then enter the command cnf-file perphone (this specifies that system generate a separate configuration XML file for each IP phone).
7. Configure VPN Group and Profile on Cisco UC by entering the following commands.
a. Router (config)# voice service voip
b. Router (conf-voi-serv)#vpn-group 1
c. Router(conf-vpn-group)#vpn-gateway 1 https://xxx.xxx.xxx.xxx/
d. Router(conf-vpn-group)#vpn-trustpoint 1 trustpoint uc_cert leaf
e. Router(conf-vpn-group)#vpn-hash-algorithm sha-1
f. Router(conf-vpn-group)#exit
g. Router (conf-voi-serv)#vpn-profile 1
h. Router(conf-vpn-profile)#authen-method both
i. Router(conf-vpn-profile)#auto-network-detect enable
j. Router(conf-vpn-profile)#host-id-check disable
k. Router(conf-vpn-profile)#exit
8. Ensure proper certificate is assigned to SSL VPN by entering the following commands.
a. Router (config)#webvpn context SDM_WEBVPN_CONTEXT_1
b. Router (config-webvpn-context)#ca trustpoint uc_cert
9. Associate a VPN Group and Profile to a SCCP IP Phone. (Note – If this is a new IP set to be connected remotely, you can provision it as per normal procedure and verify its operation first). Assuming the phone is a new set and has been already provisioned via standard procedures, you can assign the vpn-group and profile via the following commands.
a. Router(config)# ephone 1 ** dependent on the ephone tag of the phone.
b. Router (config-ephone)#vpn-group 1
c. Router (config-ephone)#vpn-profile 1
d. Router(config)# telephony-service
e. Router(config-telephony)# create cnf-files
f. Router(Config-telepony)exit
g. Router(config)# ephone 1 ** dependent on the ephone tag of the phone.
h. Router(config-ephone)# reset
Note that the command “create cnf-files” and a reset of the phone is required for vpn connectivity to establish.
10. Set Alternate TFTP Server on the IP Set. From the phone, go to:
a. Settings->Network Configuration->IPv4 Configuration->Alternate TFTP (Press **# to unlock) Select YES
b. If the phone is already registered, "TFTP Server 1" will already be populated. Otherwise, enter the CUCME address as the alternate TFTP Server 1.
c. Save the phone configuration.
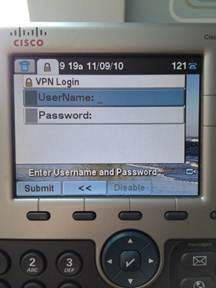
11. The phone is now ready to be taken to the remote location. When powered up, it should automatically prompt for VPN username and password (as indicated below). Enter the username and password created in step 2b.
a. 
b. In the event it doesn't automatically prompt, navigate to Settings ->Security Settings ->VPN Configurations> Enable VPN and Enter Username and Password. The Phone will then register.