Sunday, January 19, 2014

How To Install OwnCloud 6 in CentOS 6.4


To install ownCloud

Login as root

cd /etc/yum.repos.d/

wget http://download.opensuse.org/repositories/isv:ownCloud:community/CentOS_CentOS-6/isv:ownCloud:community.repo

rpm -Uvh http://download.fedoraproject.org/pub/epel/6/x86_64/epel-release-6-8.noarch.rpm

yum install owncloud

Restart Apache
service httpd restart


Setup SSL for a secure connection:

yum install mod_ssl

mkdir /etc/httpd/ssl 

openssl req -x509 -nodes -days 36500 -newkey rsa:2048 -keyout /etc/httpd/ssl/apache.key -out /etc/httpd/ssl/apache.crt

This command will prompt terminal to display a lists of fields that need to be filled in.
The most important line is "Common Name". Enter your official domain name here or, if you don't have one yet, your site's IP address.

touch /etc/httpd/conf.d/ssl.conf

vi /etc/httpd/conf.d/ssl.conf

Find the section that begins with and make some quick changes.
Uncomment the DocumentRoot and ServerName line and replace example.com with your DNS approved domain name 
        or server IP address (it should be the same as the common name on the certificate):

ServerName example.com:443


Find the following three lines, and make sure that they match the extensions below:

SSLEngine on
SSLCertificateFile /etc/httpd/ssl/apache.crt
SSLCertificateKeyFile /etc/httpd/ssl/apache.key 

Your virtual host is now all set up! Save and Exit out of the file.

Restart Apache
/etc/init.d/httpd restart


Open Browser to your server's IP

https://your_ip/owncloud

Proceed to create a username and password for admin account. 
Before submitting check under the “Advanced” dropdown for additional settings such as where is your data going to be stored and if you would like to use SQLite or MySQL
For this tutorial I will leave the data folder to default and use SQLite.
For a faster deployment you may want to use SQLite.


Upgrade To PHP 5.5

rpm -Uvh http://mirror.webtatic.com/yum/el6/latest.rpm

yum install yum-plugin-replace

yum replace php-common --replace-with=php55w-common


Increase Upload File Size greater than 513MB 

cd /var/www/html/owncloud
vi .htaccess

And change the values for

php_value upload_max_filesize 513M
php_value post_max_size 513M
php_value memory_limit 512M

To your desired/limitation values
1G,2G,10G,… max is 16GB

Save the file and restart apache server

Done!

Tuesday, October 1, 2013

Configure SSL VPN on Cisco UC540/560 and CP-79XX

1. Download Anyconnect windows package from here Cisco AnyConnect Client
2. Enable SSL VPN on UC540/560 via Cisco Configuration Assistant.
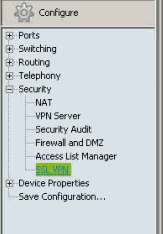
a. Log into CCA, go to Configure – Security – SSL VPN
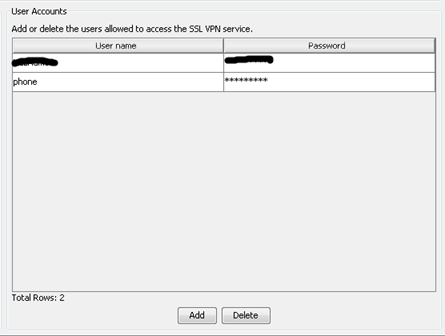
b. Under User Accounts – Click Add. Enter a new user (in this case we used user “phone” and password “ChangeMe2”).
c. Click “Advanced”. Select “Full Tunnel” mode and enter in a start and end IP range for remote clients.
d. Select “Install” under SSL VPN Client
e. Browse to the file downloaded in Step 1. Select download. (This may take some time to upload and install on the device).
f. Once it is installed, click OK to apply.
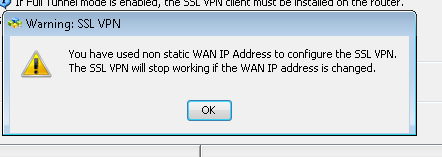
g. If device has a dynamically assigned IP address, you may receive the following error.
h. You can now close CCA, Saving the device configuration when prompted.
3. Log into Router via Telnet/SSH and enter global configuration mode.
4. Configure the UC as a Certificate Authority Server by entering the following commands.
a. Router(config)#crypto pki server uc_root
b. Router(config)#database level complete
c. Router(cs-server)#database url nvram:
d. Router(cs-server)#grant auto
e. Router(cs-server)#lifetime certificate 7305
f. Router(cs-server)#lifetime ca-certificate 7305
g. Router(cs-server)#exit
h. Router(config)#crypto pki trustpoint uc_root
i. Router(ca-trustpoint)# enrollment url
j. Router(ca-trustpoint)# revocation-check none
k. Router(ca-trustpoint)# rsakeypair uc_root
l. Router(cs-server)#exit
m. Router(config)# crypto pki server uc_root
n. Router(cs-server)#no shutdown
o. Please enter a passphrase to protect the private key Password: ***** Re-enter password: ****
5. Create a second trust point on the UC, and authenticate it and enroll it with the CA by entering the following commands.
a. Router(config)#crypto pki trustpoint uc_cert
b. Router(ca-trustpoint)# enrollment url
c. Router(ca-trustpoint)# revocation-check none
d. Router(ca-trustpoint)# exit
e. Router(config)# crypto pki authenticate uc_cert
f. Do you accept this certificate? [yes/no]: yes Trustpoint CA certificate accepted.
g. Router(config)# crypto pki enroll uc_cert Password:****** Re-enter password:******
h. Include the router serial number in the subject name? [yes/no]: no
i. Include an IP address in the subject name? [no]: no
j. Request certificate from CA? [yes/no]: yes
6. Enter telephone service configuration mode by entering the following command (telephony-service) then enter the command cnf-file perphone (this specifies that system generate a separate configuration XML file for each IP phone).
7. Configure VPN Group and Profile on Cisco UC by entering the following commands.
a. Router (config)# voice service voip
b. Router (conf-voi-serv)#vpn-group 1
c. Router(conf-vpn-group)#vpn-gateway 1 https://xxx.xxx.xxx.xxx/
d. Router(conf-vpn-group)#vpn-trustpoint 1 trustpoint uc_cert leaf
e. Router(conf-vpn-group)#vpn-hash-algorithm sha-1
f. Router(conf-vpn-group)#exit
g. Router (conf-voi-serv)#vpn-profile 1
h. Router(conf-vpn-profile)#authen-method both
i. Router(conf-vpn-profile)#auto-network-detect enable
j. Router(conf-vpn-profile)#host-id-check disable
k. Router(conf-vpn-profile)#exit
8. Ensure proper certificate is assigned to SSL VPN by entering the following commands.
a. Router (config)#webvpn context SDM_WEBVPN_CONTEXT_1
b. Router (config-webvpn-context)#ca trustpoint uc_cert
9. Associate a VPN Group and Profile to a SCCP IP Phone. (Note – If this is a new IP set to be connected remotely, you can provision it as per normal procedure and verify its operation first). Assuming the phone is a new set and has been already provisioned via standard procedures, you can assign the vpn-group and profile via the following commands.
a. Router(config)# ephone 1 ** dependent on the ephone tag of the phone.
b. Router (config-ephone)#vpn-group 1
c. Router (config-ephone)#vpn-profile 1
d. Router(config)# telephony-service
e. Router(config-telephony)# create cnf-files
f. Router(Config-telepony)exit
g. Router(config)# ephone 1 ** dependent on the ephone tag of the phone.
h. Router(config-ephone)# reset
Note that the command “create cnf-files” and a reset of the phone is required for vpn connectivity to establish.
10. Set Alternate TFTP Server on the IP Set. From the phone, go to:
a. Settings->Network Configuration->IPv4 Configuration->Alternate TFTP (Press **# to unlock) Select YES
b. If the phone is already registered, "TFTP Server 1" will already be populated. Otherwise, enter the CUCME address as the alternate TFTP Server 1.
c. Save the phone configuration.
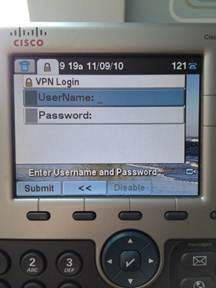
11. The phone is now ready to be taken to the remote location. When powered up, it should automatically prompt for VPN username and password (as indicated below). Enter the username and password created in step 2b.
a. 
b. In the event it doesn't automatically prompt, navigate to Settings ->Security Settings ->VPN Configurations> Enable VPN and Enter Username and Password. The Phone will then register.

Friday, July 19, 2013

Install SNMP on Centos/RHEL


The following steps will install snmp daemon on your CentOS/RHEL server :

yum install net-snmp net-snmp-utils

Edit snmpd simple configuration ( change SECRET_NAME to a complex string ) :

echo rocommunity SECRET_NAME > /etc/snmp/snmpd.conf

Start snmpd :
service snmpd restart

Also make sure it starts on boot :
chkconfig snmpd on

To check snmpd is working ( change SECRET_NAME to the string you have chose before ) :

snmpwalk -v 1 -c SECRET_NAME -O e 127.0.0.1

you should get an output like below :

SNMPv2-MIB::sysDescr.0 = STRING: Linux 2.6.18-194.11.4.el5xen #1 SMP Tue Sep 21 05:40:24 EDT 2010 x86_64
SNMPv2-MIB::sysObjectID.0 = OID: NET-SNMP-MIB::netSnmpAgentOIDs.10
DISMAN-EVENT-MIB::sysUpTimeInstance = Timeticks: (242211) 0:40:22.11
SNMPv2-MIB::sysContact.0 = STRING: root@localhost
SNMPv2-MIB::sysName.0 = STRING: 
SNMPv2-MIB::sysLocation.0 = STRING: Unknown
SNMPv2-MIB::sysORLastChange.0 = Timeticks: (2) 0:00:00.02
SNMPv2-MIB::sysORID.1 = OID: SNMPv2-MIB::snmpMIB
SNMPv2-MIB::sysORID.2 = OID: TCP-MIB::tcpMIB
SNMPv2-MIB::sysORID.3 = OID: IP-MIB::ip
SNMPv2-MIB::sysORID.4 = OID: UDP-MIB::udpMIB
SNMPv2-MIB::sysORID.5 = OID: SNMP-VIEW-BASED-ACM-MIB::vacmBasicGroup
SNMPv2-MIB::sysORID.6 = OID: SNMP-FRAMEWORK-MIB::snmpFrameworkMIBCompliance
SNMPv2-MIB::sysORID.7 = OID: SNMP-MPD-MIB::snmpMPDCompliance
SNMPv2-MIB::sysORID.8 = OID: SNMP-USER-BASED-SM-MIB::usmMIBCompliance

Saturday, July 30, 2011

Reset Cisco Switch and Router Password

How to Reset Cisco Switch Password
1. Unplug/Plug
2. Hold "Mode" button (15 secs)
> ROM (Switch)
3. flash_init
4. load_helper
4. dir flash:
> view config.text
5. rename flash:config.text flash:any_name
> bypass config.text
6. dir flash:
7. boot
8. a) #rename flash:any_name flash:config.text
        #copy flash:config.text running-config
or
     b) #copy flash:any_name running-config
9. Change password, write mem


How to Reset Cisco Router Password
1. Switch off/on
2. Ctrl-break
> ROM (rommon>)
3. confreg 0x2142
> bypass NVRAM
4. Reset
5. copy startup-config running-config
6. Change Password, then write
7. No Shutdown (Interfaces)
8. (Config)# config-register 0x2102
9. Reload


Copy IOS from COnsole after #erase flash:

Note: Use TerraTerm with Vista/Windows 7

Router
A. Connect to console
B. rommon 1> xmodem -c IOS.bin

Switch
A. Connect to Console
B. :Copy xmodem: IOS.bin flash: IOS.bin

Sunday, June 26, 2011

How To Install Gitolite

Gitolite is a tool to easily manage repositories in git with just a user account on a server. It provides access to several developers, without providing real access to a shell. It uses the ssh key. It is written by Sitaram Chamarty in the Perl language, and inspired gitosis. Gitolite can assign specific rights to a user, such as reading, (So the clone and fetch) write (push) for a repo. It is also possible to assign rights to branches or tags, practiced in a corporate environment or in the management of certain projects, for example. Gitolite can be installed without root privileges, and without additional software, only Git and Perl.

For installation, there are several ways to proceed. For users of Debian, Ubuntu, Fedora, and certainly others, it is possible to use the package system of distribution. It is also possible to start the installation with a script provided by the project. It is the solution that I use so it's the one I'll present. As I said above, Gitolite can be installed without using root privileges. So I prefer to create an individual user to manage the installation, it is also the user who will manage Git repositories. Not using the root account you can be sure access to the configuration of Git repositories has no root rights. We can then add user's public keys in / home / git / .ssh / authorized_keys.

adduser gitadmin
adduser git

Then we will take the identity of the newly created user gitadmin, and we will generate a key pair, which will add to the list of keys authorized git.

sudo su gitadmin
ssh-keygen -t dsa -b 1024
ssh-copy-id -i ~/.ssh/id_dsa.pub git@localhost

It is now possible to proceed to the installation. From the home folder of gitadmin - we start by recovering the sources of project, by cloning the project. We move into the project and we start the installation script. Note: we need to have at least Git 1.6.2 version or higher for Gitolite to work.

git clone http://github.com/sitaramc/gitolite.git
gitolite cd / src
. /gl-easy-install git localhost gitadmin

The options we pass a parameter to the install script, meaning the user will host git repositories, the server you are connected over here then localhost and the user gitadmin for the administration of repos. A series of questions will be asked, you can leave the default options. It will also be asked for a passphrase that can be left empty. Once installation is complete, we can begin to see how the configuration. It moves in the directory gitolite-admin, always with the user gitadmin of course. (User who manages the configuration) To add a user, add the public key in the folder Keydir, commit and do not forget to push as it is when the hooks that the configuration takes effect.

cp /home/lexter/id_dsa.pub Keydir/lexter.pub
git add Keydir/lexter.pub
git commit -a -m "Added user Lexter."
git push

If like me, there are more keys for the same user, there is a special syntax to use. lexter@lexter.pub lexter@work.pub - the name after the at sign may be what you want.
To delete a user, delete their key:

git rm Keydir/usersample.pub
git commit -a -m "Deleted usersample."
git push

Now to the management of repositories. Currently, two existing repo. There are of course the gitolite-admin repository and a repository-admin called testing. We note that the syntax and fairly clear and easy to understand. If we add the name of a repo that does not exist, it will be created automatically and placed in the directory / home / git / repository.

repo lexterproj
RW+ = lexter

It has such a repo, with the user who has rights lexter read, write, rewind permissions, in other words the ability to delete milestones. R: Right read only, RW: Right reading and writing, RW+: right reading, writing and rewind permission. It is also possible to manage groups. There is already a group that is @ all , it is used for testing the repo, this corresponds to all users.

@New_group = User1 user2 user3

It is now possible to use @ New_group. It is also possible to add only those rights on a branch of a repo. If you need more information about this you can see a sample configuration https://github.com/sitaramc/gitolite/blob/master/conf/example.conf. To get the project that uses git.

git clone git@host.com: lexterproj.git

One simple way to add/move a pre-existing repo to gitolite is to let gitolite create it as a brand new repo, then do the following:

cd [copy-of-your-repo]
# make sure all the branches are correct and no extra stuff, "temp"
# branches, etc., are present
git push --all git@server:reponame.git
git push --tags git@server:reponame.git

Please do a git ls-remote git@server:repo to make sure all the stuff you want went through, and is named correctly.

In conclusion, I find it really a handy tool, nice and powerful. It is very easy to configure and maintain.

Wednesday, December 29, 2010

IPTables Tutorial From Linux Journal

Here is a Three Part Tutorial Video of IPTables from Linux Journal.

Mastering IPTables Part 1


Firewall Script Part 1

### Start Of Script ###

#!/bin/sh

IPT=/sbin/iptables

$IPT -F

#policies

$IPT -P OUTPUT ACCEPT
$IPT -P INPUT DROP
$IPT -P FORWARD DROP

#allowed inputs

$IPT -A INPUT --in-interface lo -j ACCEPT
$IPT -A INPUT -p tcp --dport 22 -j ACCEPT
$IPT -A INPUT -p tcp --dport 80 -j ACCEPT

#allow responses

$IPT -A INPUT -m state --state ESTABLISHED,RELATED -j ACCEPT

### End Of Script ###


Mastering IPTables Part 2


Firewall Script Part 2

### Start Of Script ###

#!/bin/sh

IPT=/sbin/iptables

$IPT -F

#policies

$IPT -P OUTPUT ACCEPT
$IPT -P INPUT DROP
$IPT -P FORWARD DROP
$IPT -t nat -P OUTPUT ACCEPT
$IPT -t nat -P PREROUTING ACCEPT
$IPT -t nat -P POSTROUTING ACCEPT

$IPT -N SERVICES

#allowed inputs

$IPT -A INPUT --in-interface lo -j ACCEPT
$IPT -A INPUT -j SERVICES

#allow responses

$IPT -A INPUT -m state --state ESTABLISHED,RELATED -j ACCEPT

#allow services

$IPT -A SERVICES -p tcp --dport 22 -j ACCEPT
$IPT -A SERVICES -p tcp --dport 8080 -j ACCEPT

$IPT -A SERVICES -m iprange --src-range 192.168.1.1-192.168.1.254 -p tcp --dport 631 -j ACCEPT

$IPT -A SERVICES -m iprange --src-range 192.168.1.1-192.168.1.254 -p udp --dport 631 -j ACCEPT

$IPT -t nat -A PREROUTING -p tcp --dport 80 -j REDIRECT --to-ports 8080

$IPT -A FORWARD -p tcp --dport 8080 -j ACCEPT


### End Of Script ###


Mastering IPTables Part 3


Firewall Script Part 3

### Start Of Script ###

#!/bin/sh

IPT=/sbin/iptables

$IPT -F

#policies

$IPT -P OUTPUT ACCEPT
$IPT -P INPUT DROP
$IPT -P FORWARD DROP
$IPT -t nat -P OUTPUT ACCEPT
$IPT -t nat -P PREROUTING ACCEPT
$IPT -t nat -P POSTROUTING ACCEPT

$IPT -N SERVICES

#drop spoofed packets

$IPT -A INPUT --in-interface ! lo --source 127.0.0.0/8 -j DROP

#limit ping requests

$IPT -A INPUT -p icmp -m icmp -m limit --limit 1/second -j ACCEPT

#drop bogus packets

iptables -A INPUT -m state --state INVALID -j DROP
iptables -A FORWARD -m state --state INVALID -j DROP
iptables -A OUTPUT -m state --state INVALID -j DROP
$IPT -t filter -A INPUT -p tcp --tcp-flags FIN,ACK FIN -j DROP
$IPT -t filter -A INPUT -p tcp --tcp-flags ACK,PSH PSH -j DROP
$IPT -t filter -A INPUT -p tcp --tcp-flags ACK,URG URG -j DROP
$IPT -t filter -A INPUT -p tcp --tcp-flags SYN,FIN SYN,FIN -j DROP
$IPT -t filter -A INPUT -p tcp --tcp-flags SYN,RST SYN,RST -j DROP
$IPT -t filter -A INPUT -p tcp --tcp-flags FIN,RST FIN,RST -j DROP
$IPT -t filter -A INPUT -p tcp --tcp-flags ALL FIN,PSH,URG -j DROP

#allowed inputs

$IPT -A INPUT --in-interface lo -j ACCEPT
$IPT -A INPUT -j SERVICES

#allow responses

$IPT -A INPUT -m state --state ESTABLISHED,RELATED -j ACCEPT

#allow services

$IPT -A SERVICES -p tcp --dport 22 -j ACCEPT
$IPT -A SERVICES -p tcp --dport 8080 -j ACCEPT

$IPT -A SERVICES -m iprange --src-range 192.168.1.1-192.168.1.254 -p tcp --dport 631 -j ACCEPT

$IPT -A SERVICES -m iprange --src-range 192.168.1.1-192.168.1.254 -p udp --dport 631 -j ACCEPT

$IPT -t nat -A PREROUTING -p tcp --dport 80 -j REDIRECT --to-ports 8080

$IPT -A FORWARD -p tcp --dport 8080 -j ACCEPT

### End Of Script ###

Wednesday, December 15, 2010

OpenKM 5.0 on Ubuntu 10.04

OpenKM is a Knowledge Management System used in document management.

Required is the install of Sun Java JDK 1.6 on Ubuntu 10.04.

We are going to be installing Java with the help of apt-get so, as you can guess, we will be doing this from the command line. So fire up your favorite terminal window and get ready to work.

The first step is to add the necessary repositories to the /etc/apt/sources.list file. So open that file up with your favorite text editor and add the following line to the bottom of that file:

deb http://archive.canonical.com/ lucid partner

Now to update apt, issue the command:

$ sudo apt-get update

Once apt has completed its update, you are ready to install. The actual installation command is:

$ sudo aptitude install sun-java6-jdk

Next is we need to get the install files of OpenKM, download the the zip file OpenKM-5.0_JBoss-4.2.3.GA.zip from http://www.openkm.com/Download.html

Unzip the file and using winscp (http://winscp.net/eng/download.php)
- copy the jboss-4.2.3.GA folder to the Ubuntu /opt directory.

To manually run OpenKM, first go to /opt/jboss-4.2.3.GA/bin directory and run chmod +x *.sh
Then type ./run.sh -b 0.0.0.0 and enter.

Point your favorite browser to http://:8080/OpenKM/
Autenticate to OpenKM using user "okmAdmin" with password "admin"

To Run OpenKM as a Service so that OpenKM will run after a reboot, go to the console of ubuntu
Run $ vi /etc/init.d/jboss

Insert the following lines to the vi editor:
#! /bin/sh
# /etc/init.d/jboss: Start and stop JBoss AS
ECHO=/bin/echo
TEST=/usr/bin/test
JBOSS_START_SCRIPT=/opt/jboss-4.2.3.GA/bin/run.sh
JBOSS_STOP_SCRIPT=/opt/jboss-4.2.3.GA/bin/shutdown.sh

$TEST -x $JBOSS_START_SCRIPT || exit 0
$TEST -x $JBOSS_STOP_SCRIPT || exit 0

start() {
$ECHO -n "Starting JBoss"
sudo $JBOSS_START_SCRIPT -b 0.0.0.0 > /dev/null 2> /dev/null &
$ECHO "."
}

stop() {
$ECHO -n "Stopping JBoss"
sudo $JBOSS_STOP_SCRIPT -S > /dev/null &
$ECHO "."
}

case "$1" in
start)
start
;;
stop)
stop
;;
restart)
stop
sleep 30
start
;;
*)
$ECHO "Usage: jboss {start|stop|restart}"
exit 1
esac

exit 0

#end of script

Make the file executable with
$ sudo chmod 755 /etc/init.d/jboss

Update the run levels with
$ sudo update-rc.d jboss defaults

Done. The OpenKM now runs as a service. You can start OpenKM with
$ sudo ./etc/init.d/jboss start

Last step is to update the database config file to prevent the repositories from being deleted.
$ vi /opt/jboss-4.2.3.GA/OpenKM.cfg

Change the line hibernate.hbm2ddl=create to hibernate.hbm2ddl=none

Note:
From OpenKM 5.x there's a property definition in OpenKM.cfg to create automatically database. Once the tables are created, change the hibernate.hbm2ddl property from create to none. Do it after first time running, in other case all repository it'll be deleted and created in next OpenKM starting