Here is a Three Part Tutorial Video of IPTables from Linux Journal.
Mastering IPTables Part 1
Firewall Script Part 1
### Start Of Script ###
#!/bin/sh
IPT=/sbin/iptables
$IPT -F
#policies
$IPT -P OUTPUT ACCEPT
$IPT -P INPUT DROP
$IPT -P FORWARD DROP
#allowed inputs
$IPT -A INPUT --in-interface lo -j ACCEPT
$IPT -A INPUT -p tcp --dport 22 -j ACCEPT
$IPT -A INPUT -p tcp --dport 80 -j ACCEPT
#allow responses
$IPT -A INPUT -m state --state ESTABLISHED,RELATED -j ACCEPT
### End Of Script ###
Mastering IPTables Part 2
Firewall Script Part 2
### Start Of Script ###
#!/bin/sh
IPT=/sbin/iptables
$IPT -F
#policies
$IPT -P OUTPUT ACCEPT
$IPT -P INPUT DROP
$IPT -P FORWARD DROP
$IPT -t nat -P OUTPUT ACCEPT
$IPT -t nat -P PREROUTING ACCEPT
$IPT -t nat -P POSTROUTING ACCEPT
$IPT -N SERVICES
#allowed inputs
$IPT -A INPUT --in-interface lo -j ACCEPT
$IPT -A INPUT -j SERVICES
#allow responses
$IPT -A INPUT -m state --state ESTABLISHED,RELATED -j ACCEPT
#allow services
$IPT -A SERVICES -p tcp --dport 22 -j ACCEPT
$IPT -A SERVICES -p tcp --dport 8080 -j ACCEPT
$IPT -A SERVICES -m iprange --src-range 192.168.1.1-192.168.1.254 -p tcp --dport 631 -j ACCEPT
$IPT -A SERVICES -m iprange --src-range 192.168.1.1-192.168.1.254 -p udp --dport 631 -j ACCEPT
$IPT -t nat -A PREROUTING -p tcp --dport 80 -j REDIRECT --to-ports 8080
$IPT -A FORWARD -p tcp --dport 8080 -j ACCEPT
### End Of Script ###
Mastering IPTables Part 3
Firewall Script Part 3
### Start Of Script ###
#!/bin/sh
IPT=/sbin/iptables
$IPT -F
#policies
$IPT -P OUTPUT ACCEPT
$IPT -P INPUT DROP
$IPT -P FORWARD DROP
$IPT -t nat -P OUTPUT ACCEPT
$IPT -t nat -P PREROUTING ACCEPT
$IPT -t nat -P POSTROUTING ACCEPT
$IPT -N SERVICES
#drop spoofed packets
$IPT -A INPUT --in-interface ! lo --source 127.0.0.0/8 -j DROP
#limit ping requests
$IPT -A INPUT -p icmp -m icmp -m limit --limit 1/second -j ACCEPT
#drop bogus packets
iptables -A INPUT -m state --state INVALID -j DROP
iptables -A FORWARD -m state --state INVALID -j DROP
iptables -A OUTPUT -m state --state INVALID -j DROP
$IPT -t filter -A INPUT -p tcp --tcp-flags FIN,ACK FIN -j DROP
$IPT -t filter -A INPUT -p tcp --tcp-flags ACK,PSH PSH -j DROP
$IPT -t filter -A INPUT -p tcp --tcp-flags ACK,URG URG -j DROP
$IPT -t filter -A INPUT -p tcp --tcp-flags SYN,FIN SYN,FIN -j DROP
$IPT -t filter -A INPUT -p tcp --tcp-flags SYN,RST SYN,RST -j DROP
$IPT -t filter -A INPUT -p tcp --tcp-flags FIN,RST FIN,RST -j DROP
$IPT -t filter -A INPUT -p tcp --tcp-flags ALL FIN,PSH,URG -j DROP
#allowed inputs
$IPT -A INPUT --in-interface lo -j ACCEPT
$IPT -A INPUT -j SERVICES
#allow responses
$IPT -A INPUT -m state --state ESTABLISHED,RELATED -j ACCEPT
#allow services
$IPT -A SERVICES -p tcp --dport 22 -j ACCEPT
$IPT -A SERVICES -p tcp --dport 8080 -j ACCEPT
$IPT -A SERVICES -m iprange --src-range 192.168.1.1-192.168.1.254 -p tcp --dport 631 -j ACCEPT
$IPT -A SERVICES -m iprange --src-range 192.168.1.1-192.168.1.254 -p udp --dport 631 -j ACCEPT
$IPT -t nat -A PREROUTING -p tcp --dport 80 -j REDIRECT --to-ports 8080
$IPT -A FORWARD -p tcp --dport 8080 -j ACCEPT
### End Of Script ###
Wednesday, December 29, 2010
Wednesday, December 15, 2010
OpenKM 5.0 on Ubuntu 10.04
OpenKM is a Knowledge Management System used in document management.
Required is the install of Sun Java JDK 1.6 on Ubuntu 10.04.
Unzip the file and using winscp (http://winscp.net/eng/download.php)
- copy the jboss-4.2.3.GA folder to the Ubuntu /opt directory.
To manually run OpenKM, first go to /opt/jboss-4.2.3.GA/bin directory and run chmod +x *.sh
Then type ./run.sh -b 0.0.0.0 and enter.
Point your favorite browser to http://:8080/OpenKM/
Autenticate to OpenKM using user "okmAdmin" with password "admin"
To Run OpenKM as a Service so that OpenKM will run after a reboot, go to the console of ubuntu
Run $ vi /etc/init.d/jboss
Insert the following lines to the vi editor:
Last step is to update the database config file to prevent the repositories from being deleted.
$ vi /opt/jboss-4.2.3.GA/OpenKM.cfg
Change the line hibernate.hbm2ddl=create to hibernate.hbm2ddl=none
Note:
From OpenKM 5.x there's a property definition in OpenKM.cfg to create automatically database. Once the tables are created, change the hibernate.hbm2ddl property from create to none. Do it after first time running, in other case all repository it'll be deleted and created in next OpenKM starting
Required is the install of Sun Java JDK 1.6 on Ubuntu 10.04.
We are going to be installing Java with the help of apt-get so, as you can guess, we will be doing this from the command line. So fire up your favorite terminal window and get ready to work.
The first step is to add the necessary repositories to the /etc/apt/sources.list file. So open that file up with your favorite text editor and add the following line to the bottom of that file:
deb http://archive.canonical.com/ lucid partner
Now to update apt, issue the command:
$ sudo apt-get update
Once apt has completed its update, you are ready to install. The actual installation command is:
$ sudo aptitude install sun-java6-jdk
Next is we need to get the install files of OpenKM, download the the zip file OpenKM-5.0_JBoss-4.2.3.GA.zip from http://www.openkm.com/Download.htmlUnzip the file and using winscp (http://winscp.net/eng/download.php)
- copy the jboss-4.2.3.GA folder to the Ubuntu /opt directory.
To manually run OpenKM, first go to /opt/jboss-4.2.3.GA/bin directory and run chmod +x *.sh
Then type ./run.sh -b 0.0.0.0 and enter.
Point your favorite browser to http://
Autenticate to OpenKM using user "okmAdmin" with password "admin"
To Run OpenKM as a Service so that OpenKM will run after a reboot, go to the console of ubuntu
Run $ vi /etc/init.d/jboss
Insert the following lines to the vi editor:
#! /bin/sh
#  /etc/init.d/jboss: Start and stop JBoss AS
ECHO=/bin/echo
TEST=/usr/bin/test
JBOSS_START_SCRIPT=/opt/jboss-4.2.3.GA/bin/run.sh
JBOSS_STOP_SCRIPT=/opt/jboss-4.2.3.GA/bin/shutdown.sh

$TEST -x $JBOSS_START_SCRIPT || exit 0
$TEST -x $JBOSS_STOP_SCRIPT || exit 0

start() {
     $ECHO -n "Starting JBoss"
     sudo $JBOSS_START_SCRIPT -b 0.0.0.0 > /dev/null 2> /dev/null &
     $ECHO "."
}

stop() {
     $ECHO -n "Stopping JBoss"
     sudo $JBOSS_STOP_SCRIPT -S > /dev/null &
     $ECHO "."
}

case "$1" in
     start)
           start
           ;;
     stop)
           stop
           ;;
     restart)
           stop
           sleep 30
           start
           ;;
     *)
           $ECHO "Usage: jboss {start|stop|restart}"
           exit 1
esac

exit 0

#end of script
Make the file executable with
$ sudo chmod 755 /etc/init.d/jboss
Done. The OpenKM now runs as a service. You can start OpenKM with
$ sudo ./etc/init.d/jboss start
$ sudo chmod 755 /etc/init.d/jboss
Update the run levels with
$ sudo update-rc.d jboss defaults
$ sudo update-rc.d jboss defaults
Done. The OpenKM now runs as a service. You can start OpenKM with
$ sudo ./etc/init.d/jboss start
Last step is to update the database config file to prevent the repositories from being deleted.
$ vi /opt/jboss-4.2.3.GA/OpenKM.cfg
Change the line hibernate.hbm2ddl=create to hibernate.hbm2ddl=none
Note:
From OpenKM 5.x there's a property definition in OpenKM.cfg to create automatically database. Once the tables are created, change the hibernate.hbm2ddl property from create to none. Do it after first time running, in other case all repository it'll be deleted and created in next OpenKM starting

Thursday, October 28, 2010
MRTG On Ubuntu Server
This article will describe how to install and configure Tobi Oetiker’s MRTG (Multi Router Traffic Grapher) on your Ubuntu server. Once configured, you’ll be able to use it to monitor the traffic in and out of your network using the SNMP capability in your network’s gateway/router. MRTG generates static HTML pages containing PNG images which provide a visual representation of this traffic. MRTG typically produces daily, weekly, monthly, and yearly graphs. MRTG is written in perl and works on Unix/Linux as well as Windows. MRTG is free software licensed under the GNU GPL.
So, let’s get started.
Download and Install
First, download and install MRTG using apt-get:
If this is the first time installing MRTG on your server you’ll likely be presented with the following message. Answering “Yes” means that the default configuration file will be installed with permissions set at 640. Answering “No” means that the permissions are set at 644. In this example we’re going to accept the default Yes. No worries though, if you select No the steps in this tutorial will still work.

MRTG installs a sample configuration file, mrtg.cfg, in /etc. This is the file that will eventually hold the information obtained from your gateway\router. MRTG also creates a directory for the html pages it will serve up at /var/www/mrtg. For a full listing of what MRTG installs and where, run the locate command:
Technically speaking, mrtg.cfg could remain in /etc, but just to keep things tidy, and to help facilitate the startup script that will be created later, let’s create a directory for it and move it into that directory:
That’s it for installing MRTG. Now let’s move on and configure it.
Configure
MRTG includes a script called cfgmaker that will help us populate mrtg.cfg with the information obtained from your gateway/router. But before you run cfgmaker, you should set up the snmp community. This usually involves logging into your gateway/router and enabling SNMP. The default community will typically be “public.” If you change the default community to another name though, make note of it. Now, run the following command, substituting the SNMP community name, if you’ve changed it, and adding the IP address of your gateway/router:
Next, open mrtg.cfg in a text editor and make sure under Global Configiration Options that “WorkDir: /var/www/mrtg” (under Debian) is uncommented, and under Global Defaults, make sure that “Options[_]: growright, bits” is uncommented. Finally, add the following lines under the Global Defaults section:
What does all this do? RunAsDaemon will enable MRTG to run as a daemon. This is beneficial because MRTG is launched only once, thus the parsing of mrtg.cfg file is done only once, not repeatedly as would be the case if one were to run MRTG as a cron task – another acceptable method for running MRTG. Also, when running as a daemon, MRTG itself is responsible for timing the measurement intervals; therefore, we need to add the Interval option and assign it a value – in this case 5 (minutes). This means that every five minutes MRTG will update its graphs.
Speaking of graphs, by default MRTG graphs grow to the left, so by adding the option “growright” the direction of the traffic visible in MRTG’s graphs flips causing the current time to be at the right edge of the graph and the history values to the left of it. We’ve also chosen the “bits” option, which means that the monitored traffic values obtained from your gateway/router are multiplied by 8 and displayed bits per second instead of bytes per second. Finally, we’ve given MRTG a directory to put its log file, and because many routers do not currently support SNMP over IPv6, we’ve shut that off.
Okay, now it’s time to create the web pages which display the MRTG graphs. Run the following command:
MRTG has been configured. Let’s start it up and see what it displays
Start
There’s something important to keep in mind when starting MRTG, and that is that MRTG requires the environmental variable “LANG” to be C in order to run properly. Since most Linux systems these days, including Ubuntu server, use UTF-8 (run echo $LANG to see what your system uses), let’s change LANG to C and start MRTG using the following command:
When you run MRTG for the first time you may see a lot of complaints about missing log files. No worries, this is normal for the first 2-3 times you start MRTG this way. If, however, it continues to complain you may want to look into the source of the problem.
Well, that’s it. Now point your browser to http://your-server-address/mrtg and you should see a page that resembles the following. You may have more or less graphs depending on the number interfaces reported by your gateway/router.
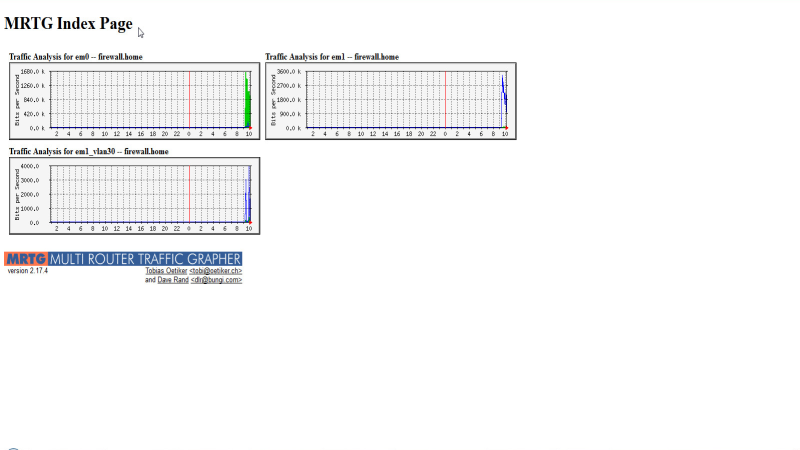
Because of the aforementioned options added to mrtg.cfg, you’ll see the graph starting “grow” to the right as the traffic is monitored over time, and the Y axis displayed as bits per second. If you click on any one of these graphs you’ll be taken to another page showing individual graphs for daily, weekly, monthly, and yearly traffic averages, along with the maximum, average, and current bit rate in and out of that particular interface. Only interested in displaying one particular interface? Don’t like the look of the page? No worries, just edit mrtg.cfg and/or /var/www/mrtg until you get it looking the way you want.
Okay, so now that we have MRTG installed, configured and running let’s move on and discuss how to keep it running.
Operate
Starting MRTG by hand is not ideal in the long run. So perhaps after you’ve done some tweaking on MRTG and are satisfied with your results, you can automate the process of running MRTG by creating a startup script in your system startup sequence. Here’s the script that I use:
To use this script simply save it as “mrtg” to your home directory. Now make the file executable and move it to /etc/init.d by running the following command:
Finally, link the script to the appropriate system run-level. For Debian or Ubuntu this should be 2. In most other Linux distributions, it will typically be 4 or 5.
Now, let’s start MRTG using our script. If it’s currently running then substitute restart for start in the following command:
That’s it. Now if for some reason your server is rebooted, MRTG should fire up automatically.
Conclusion
This concludes the article on how to install and configure MRTG on Ubuntu server. As you can see, MRTG isn’t terribly complicated and proves to be a really nice open source package for monitoring and displaying traffic in and out your network from virtually anywhere you have a web browser. For a full list of all the configuration options and other information I encourage you to visit the MRTG web site.
References
http://oss.oetiker.ch/mrtg/doc/index.en.html
So, let’s get started.
Download and Install
First, download and install MRTG using apt-get:
sudo apt-get install mrtg |
sudo updatedb && locate mrtg |
sudo mkdir /etc/mrtg && sudo mv /etc/mrtg.cfg /etc/mrtg |
Configure
MRTG includes a script called cfgmaker that will help us populate mrtg.cfg with the information obtained from your gateway/router. But before you run cfgmaker, you should set up the snmp community. This usually involves logging into your gateway/router and enabling SNMP. The default community will typically be “public.” If you change the default community to another name though, make note of it. Now, run the following command, substituting the SNMP community name, if you’ve changed it, and adding the IP address of your gateway/router:
sudo cfgmaker --output /etc/mrtg/mrtg.cfg public@your-router's-IP-address |
RunAsDaemon: Yes |
Interval: 5 |
Logdir: /var/log/ |
EnableIPv6: no |
Speaking of graphs, by default MRTG graphs grow to the left, so by adding the option “growright” the direction of the traffic visible in MRTG’s graphs flips causing the current time to be at the right edge of the graph and the history values to the left of it. We’ve also chosen the “bits” option, which means that the monitored traffic values obtained from your gateway/router are multiplied by 8 and displayed bits per second instead of bytes per second. Finally, we’ve given MRTG a directory to put its log file, and because many routers do not currently support SNMP over IPv6, we’ve shut that off.
Okay, now it’s time to create the web pages which display the MRTG graphs. Run the following command:
sudo indexmaker --output=/var/www/mrtg/index.html /etc/mrtg/mrtg.cfg |
Start
There’s something important to keep in mind when starting MRTG, and that is that MRTG requires the environmental variable “LANG” to be C in order to run properly. Since most Linux systems these days, including Ubuntu server, use UTF-8 (run echo $LANG to see what your system uses), let’s change LANG to C and start MRTG using the following command:
sudo env LANG=C /usr/bin/mrtg /etc/mrtg/mrtg.cfg |
Well, that’s it. Now point your browser to http://your-server-address/mrtg and you should see a page that resembles the following. You may have more or less graphs depending on the number interfaces reported by your gateway/router.
Okay, so now that we have MRTG installed, configured and running let’s move on and discuss how to keep it running.
Operate
Starting MRTG by hand is not ideal in the long run. So perhaps after you’ve done some tweaking on MRTG and are satisfied with your results, you can automate the process of running MRTG by creating a startup script in your system startup sequence. Here’s the script that I use:
##### START OF SCRIPT #####
#!/bin/bash

### START OF SCRIPT
MRTG="/usr/bin/mrtg"
CONFIG="/etc/mrtg/mrtg.cfg"
PIDFILE="/etc/mrtg/mrtg.pid"
LOCKFILE="/etc/mrtg/mrtg"
OPTIONS="--daemon"

RETVAL=0

start() {
 echo -n $"Enabling MRTG: "
 rm -f ${LOCKFILE} 2> /dev/null
 env LANG=C ${MRTG} --pid-file=${PIDFILE} --lock-file=${LOCKFILE} ${OPTIONS} ${CONFIG}
 RETVAL=$?
 echo
}

stop() {
 echo -n $"Disabling MRTG: "
 kill `cat ${PIDFILE}` && rm -f ${LOCKFILE}
 RETVAL=$?
 echo
}

restart() {
 stop
 start
}

case "$1" in
 start)
 start
 ;;
 stop)
 stop
 ;;
 restart|force-reload)
 restart
 ;;
 status)
 if [ -f $LOCKFILE ]; then
  echo $"MRTG is enabled."
  RETVAL=0
 else
  echo $"MRTG is disabled."
  RETVAL=3
 fi
 ;;
 *)
 echo $"Usage: $0 {start|stop|status|restart|force-reload}"
 exit 1
esac

exit $RETVAL

###### END OF SCRIPT #####
| |
chmod +x mrtg && sudo mv mrtg /etc/init.d/ |
sudo ln -s /etc/init.d/mrtg /etc/rc2.d/S99mrtg |
sudo ln -s /etc/init.d/mrtg /etc/rc2.d/K99mrtg |
sudo /etc/init.d/mrtg start |
Conclusion
This concludes the article on how to install and configure MRTG on Ubuntu server. As you can see, MRTG isn’t terribly complicated and proves to be a really nice open source package for monitoring and displaying traffic in and out your network from virtually anywhere you have a web browser. For a full list of all the configuration options and other information I encourage you to visit the MRTG web site.
References
http://oss.oetiker.ch/mrtg/doc/index.en.html
Wednesday, July 21, 2010
Install OTRS 2.4 on Ubuntu 10.04 LTS Server
First you need to install LAMP on Ubuntu.
There are only two steps to install OTRS.
Step 1: From the console as root, run:
root@srv1:~# apt-get install libapache2-mod-perl2-dev
Step 2: root@srv1:~# apt-get install otrs2
If you forget to do Step 1, you will encounter an error ...
"dpkg: error processing otrs2 (--configure):
subprocess post-installation script returned error exit status 1
Errors were encountered while processing:
otrs2
E: Sub-process /usr/bin/dpkg returned an error code (1)"
Run the following to fix the error:
root@srv1:~# apt-get install libapache2-mod-perl2-dev
Then purge the otrs install:
root@srv1:~# apt-get purge otrs2
And finally install again otrs
root@srv1:~# apt-get install otrs2
Once the installation is completed, Login to the website of OTRS:
http://[ip address of OTRS Server]/otrs
Username: root@localhost
Password: root
There are only two steps to install OTRS.
Step 1: From the console as root, run:
root@srv1:~# apt-get install libapache2-mod-perl2-dev
Step 2: root@srv1:~# apt-get install otrs2
If you forget to do Step 1, you will encounter an error ...
"dpkg: error processing otrs2 (--configure):
subprocess post-installation script returned error exit status 1
Errors were encountered while processing:
otrs2
E: Sub-process /usr/bin/dpkg returned an error code (1)"
Run the following to fix the error:
root@srv1:~# apt-get install libapache2-mod-perl2-dev
Then purge the otrs install:
root@srv1:~# apt-get purge otrs2
And finally install again otrs
root@srv1:~# apt-get install otrs2
Once the installation is completed, Login to the website of OTRS:
http://[ip address of OTRS Server]
Username: root@localhost
Password: root
Thursday, March 25, 2010
Getting Midnight Commander line drawing to work with PuTTY
When using Midnight Commander with the default settings of PuTTY connected to my Ubuntu Linux machine the line drawing characters are all messed up.
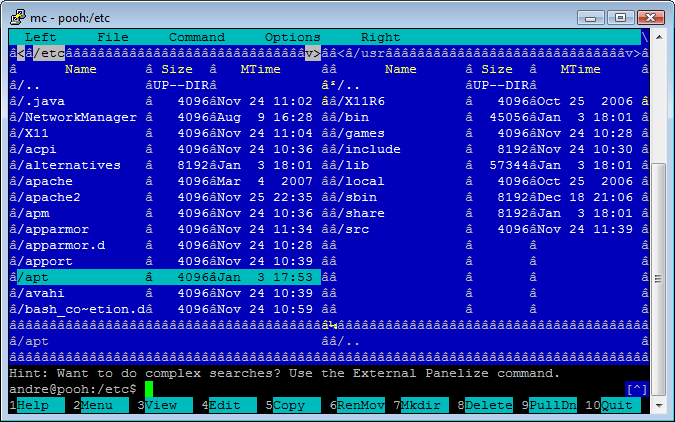
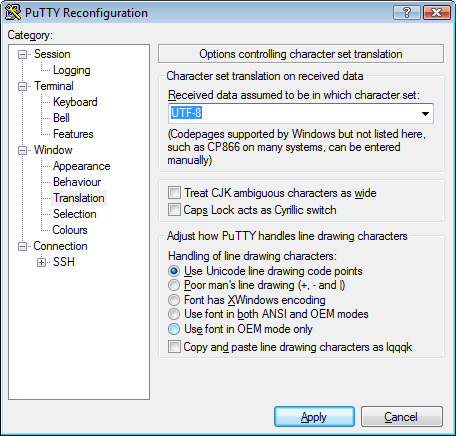
After some experimentation it turns out that to fix it all you have to do is change your character set in PuTTY to UTF-8 and the problem is fixed. To do this open up the PuTTY settings and go to Window->Translation->Received data assumed to be in which character set: and change it to UTF-8.
After making this change you might have to force a redraw of the mc screen to show the new line drawing characters:
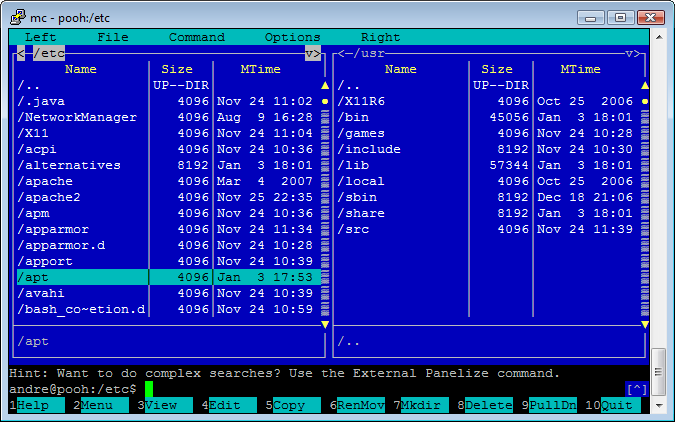
Also not that some fonts might not have the line drawing characters available. The fonts I know work is Courier New and Lucida Console. To change your font go to Window->Appearance, Font settings and click the Change button.
For reference, I was using using Midnight Commander 4.6.2 running on Ubuntu 8.04 and using PuTTY 0.60
Monday, March 22, 2010
Open Source Systems
Here are a list of PHP based Content Management System (CMS):
Cloud Database
Development Environment
Virtual Appliance:
Cloud Database
Development Environment
Virtual Appliance:
System Tools
Open Source Helpdesk Ticketing Systems
Here is a link to the Open Source Helpdesk Ticketing Systems - Trellis Desk
Subscribe to:
Posts (Atom)